Posts

Showing posts from April, 2023

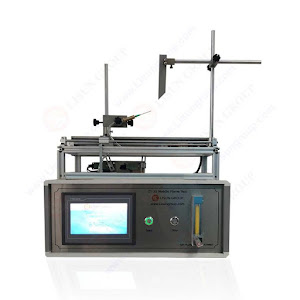
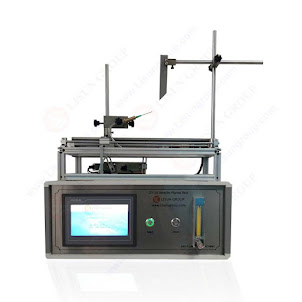
What are the principles of LISUN glow wire tester?

Image
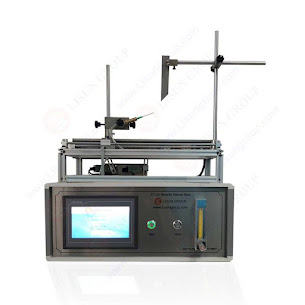
  The LISUN glow wire tester is a device that simulates real-life situations in which a product might catch fire in order to determine how likely it is that an electrical or electronic piece of equipment would catch fire in the event of an accident. The LISUN glow wire tester operates according to the following guiding principles: Measurement of temperature: This glow wire tester makes use of a thermocouple, which is brought into direct contact with the wire in order to get an accurate reading of the wire's temperature. Ignition source: the wire is heated by an electrical current, and once it reaches a particular temperature, it will ignite, mimicking a fire danger. Once it reaches this temperature, the wire will ignite. Preparing the Specimen: The specimen for testing is prepared by securing it to the testing apparatus in a manner that replicates the circumstances that would be present in actual use. Test technique: The testing procedure consists of heating the wire to a certain

The definition and meaning of glow wire test

Image
The Glow Wire Test is a technique of testing that adheres to industry standards and is used to assess the potential for an electrical or electronic device to start a fire. The goal of the test is to imitate real-life settings in which a product may catch fire and to identify the behavior of the product when it is subjected to heat and ignition sources. In addition, the test will determine whether or not the product will catch fire. In order to conduct the test, first a thin wire, also known as a glow wire, is brought to a certain temperature, and then it is brought into contact with the item being evaluated. The specimen for testing is prepared by securing it to the testing apparatus in a manner that replicates the circumstances that would be present during actual use. After the wire has reached the required temperature, it will ignite, and then the behavior of the test specimen will be studied while it is being put through its paces. The outcomes of the examination are analyzed wit

How do you run a glow wire test with a glow wire test apparatus?

Image
The following procedures need to be carried out in order to successfully complete a Glow Wire Test with a Glow Wire Test Apparatus : Obtain the test specimen and attach it to the tester in a manner that replicates the circumstances that would be present during actual use. This completes the preparation phase. In addition to this, double check that the tester has been calibrated properly and that the test circumstances have been established in accordance with the applicable standard. The wire is heated by an electrical current until it reaches the temperature that is set, at which point it ignites. The ignited wire is brought into touch with the test specimen, and the behavior of the specimen is monitored once this contact has been made. The results of the test are documented by noting the occurrence of any igniting or burning of the test specimen, as well as the duration of any flaming that does occur. The findings of the test are analyzed and interpreted in a manner that takes into

LISUN glow wire tester is designed according to IEC and UL

Image
The International Electrotechnical Commission (IEC) and Underwriters Laboratories both contributed to the development of the specifications that were used in the construction of the LISUN glow wire tester (UL). These organizations formulate and continue to update safety standards for the electrical and electronic equipment they manufacture, and the LISUN glow wire tester is developed to conform to these guidelines. The IEC and UL standards both specify the test conditions and procedures that must be followed in order to accurately evaluate the potential for an electrical or electronic device to start a fire. These conditions and procedures include the temperature and duration of the glow wire, as well as the preparation of the test specimen and the analysis of the results. The LISUN glow wire tester was developed to fulfill these parameters, and as a consequence, it delivers results that are accurate and reliable. Furthermore, these results are equivalent to those achieved by other

How to use a IEC60529 glow wire tester ?

Image
The IEC 60529 Glow Wire Tester is used in the process of determining whether or not a piece of electrical or electronic equipment poses a risk of starting a fire. The goal of the test is to imitate real-life settings in which a product may catch fire and to identify the behavior of the product when it is subjected to heat and ignition sources. In addition, the test will determine whether or not the product will catch fire. When using an IEC 60529 Glow Wire Tester, the following procedures are recommended to be carried out: Obtain the test specimen and attach it to the tester in a manner that replicates the circumstances that would be present during actual use. This completes the preparation phase. Make it a point to check that the tester has been calibrated and that the test circumstances have been set up in accordance with the applicable IEC 60529 standard. Ignition of the Glow Wire The wire is heated by an electrical current until it reaches the temperature that is set, at which p

What is a flame test and how to do a flame test?

Image
A flame test for lights is a process that is used to determine whether or not a variety of lighting goods are flammable. The test replicates the kinds of situations that may occur in real life if a product were to catch fire, and it helps assess how the product will react when it is subjected to sources of heat and ignition. The lighting product's fire resistance is being evaluated via the use of the flame test in order to confirm that it is safe to use. In order to check the lights using a flame test: Obtain the lighting product and attach it to the testing equipment in a manner that replicates the circumstances that would be present during normal use. This is the preparation step. A flame may be ignited by a Bunsen burner or a propane torch, both of which are examples of ignition sources. After bringing the flame into contact with the lighting product, the behavior of the product is observed. The results of the test are documented by noting the occurrence of any ignition or

How many kinds of flame tests are there according to IEC standards?

Image
According to the regulations established by the International Electrotechnical Commission (IEC), there are a few different kinds of flame tests that may be performed on lights. The following are examples of some of the flame tests for lights that are most often used: This standard addresses the horizontal and vertical flammability tests for completed items, such as lighting products. IEC 60695-11-10 is the number for this standard. This standard addresses the flammability test for light sources, such as LED modules and lamps, and is designated as IEC 60695-11-20. This standard addresses the flammability test for LED luminaires and LED retrofit bulbs, and its designation is IEC 60695-11-30. This standard addresses the flammability test for material samples, including those used in the production of lighting products. It is designated as IEC 60695-2-10. This standard addresses the flammability test for the surface spread of flame of materials and products, and its designation is IEC 6

What is a horizontal vertical flame test and how to do the test according to iec 60695-11-10?

Image
To determine whether or not a final product, such as a lighting product, is flammable, a procedure called the horizontal and vertical flame test, which complies with IEC 60695-11-10 , is used. The test replicates the kinds of situations that may occur in real life if a product were to catch fire, and it helps assess how the product will react when it is subjected to sources of heat and ignition. By gauging how well the lighting product performs in a fire, the goal of the test is to make certain that the product is safe to use. IEC 60695-11-10 specifies the following steps must be taken in order to carry out a horizontal and vertical flame test: Obtain the lighting product and attach it to the testing equipment in a manner that replicates the circumstances that would be present during normal use. This is the preparation step. A flame may be ignited by a Bunsen burner or a propane torch, both of which are examples of ignition sources. The flame is brought into contact with the ligh

FMVSS 302 Flammability test of Automotive Materials

Image
The National Highway Traffic Safety Administration (NHTSA) in the United States has established a standard known as FMVSS 302 , which stands for the Federal Motor Vehicle Safety Standard 302. This standard's purpose is to guarantee that automotive materials are not easily combustible. The standards for flammability testing of materials used in the interior and exterior of passenger vehicles, lorries, and buses are specified in the standard. These requirements must be met. The objective of the inspection is to lessen the possibility of a fire starting and to stop the propagation of flames in the event that there is an accident or another source of ignition. To carry out a flammability test in accordance with FMVSS 302: Obtaining the automotive material and preparing it in accordance with the testing method outlined in FMVSS 302 is the first step in the preparation process. This can include chopping the material into a certain size or form and then putting it on the instrument th

Introduction of ANSI/UL 94 horizontal vertical flame test

Image
Underwriters Laboratories (UL), an independent testing and certification organization, developed the ANSI/UL 94 standard to assess the combustibility of plastic materials. The standard is known as "ANSI/UL 94." The standard evaluates plastics using a number of different tests, one of which is the horizontal and vertical flame test. This test evaluates how easily flames can be started on plastic materials and how quickly they can spread. In order to carry out the horizontal flame test , also known as the UL 94 HB, a sample of the plastic material is arranged in a horizontal position and then subjected to a flame for the amount of time that has been determined. The objective of the test is to determine how easily the material can be ignited and how quickly flames can spread over its surface. The vertical flame test, also known as UL 94 V, is carried out by holding a specimen of the plastic material vertically in a flame for the amount of time that is indicated in the test.

What are the differences of FMVSS 302, UL94 and IEC60695 for flammability test?

Image
The flammability of different materials, such as plastics and other materials used in items such as automobile interiors, electronic devices, and electrical appliances, is evaluated using a number of different standards. Some of these standards are FMVSS 302, UL 94, and IEC 60695. Nevertheless, there are a number of important distinctions between these standards: FMVSS 302 is a specialized standard that was designed for the automotive industry to analyze the flammability of materials used in car interiors. Its purpose is to measure the combustibility of these materials. The UL 94 standard is a more comprehensive regulation that assesses the combustibility of a variety of materials, including plastics, and has applications in a number of different sectors. IEC 60695 is a global standard that is used in the process of assessing the potential for electronic and electrical equipment to catch fire. Testing Procedures The flammability of materials is determined using a variety of testing

What does IPX1 mean and how to do IPX1 waterproof test?

Image
IPX1 is an international standard that was developed by the International Electrotechnical Commission (IEC) to identify the degree of protection that electronic and electrical equipment provide against the intrusion of water. IPX1 is used to identify the degree to which electronic and electrical equipment is protected against water and describes the level of protection against water that is provided against leaking. It is determined whether or not a product satisfies the standards of IPX1 by subjecting it to the IPX1 waterproof test. The technique for putting the product through its paces comprises holding it in an upright posture while water is poured over it at a rate of 3 millimeters per minute for a period of 10 minutes. If over the course of the test there is no evidence of any water getting into the product, then the test is regarded to have been successful. It is essential to keep in mind that the IPX1 test only analyzes the device's resistance to water that is dripping

What is IPX2 IP rating and what equipment do you need to do IPX2 waterproof test?

Image
IPX2 is a grade that indicates the amount of protection offered against water intrusion in electronic and electrical goods. This rating was specified and established by the International Electrotechnical Commission (IEC) . The protection against water dripping off of a product is defined by the IPX2 standard when the product is tilted at an angle of 15 degrees from its usual position. This indicates that the product need to continue to be secured from water pouring off of it even when it is tipped at an angle of fifteen degrees. You will need the following items in order to carry out an IPX2 waterproof test successfully: Drip Box: A drip box is a container that is used to manage the pace and amount of water that is dripping onto the product that is being tested. This container also houses the product that is being tested. Drip Rate Controller: A drip rate controller is a device that is used to control the amount of water that drips onto a product by varying the flow rate. Inclinati

What kinds of products need to meet IPX3 waterproof IP level?

Image
A waterproof rating of IPX3 is set by the International Electrotechnical Commission (IEC) to indicate the degree of protection offered against water infiltration in electronic and electrical devices. This certification is given to items with a resistance level of IPX3. Products that are subjected to water spray, such as electronics and appliances used outside, must have a waterproof rating of at least IPX3 in order to be considered really water resistant. Outdoor speakers, outdoor lighting fixtures, outdoor security cameras, portable Bluetooth speakers, and other goods that are functionally equivalent must all achieve an IPX3 waterproof degree of protection. These goods are often used in locations that are subjected to water spray from many sources, including rain, sprinklers, and other types of sources. In order for a device to be rated as waterproof to the IPX3 standard, it must be able to resist water spray coming from any direction for at least 5 minutes without allowing any w

How do you do IPX3 water proof test for your end-products?

Image
The IPX3 water resistance test is carried out in order to determine the degree of protection afforded to electronic and electrical equipment against the intrusion of water. As part of the testing method, the product will be sprayed with water from a variety of directions to determine whether or not it can tolerate being subjected to water spray without allowing water to enter the device's internal workings. The following pieces of apparatus are needed in order to carry out the IPX3 waterproof test successfully: Spray nozzle: This is what will be utilized to create a consistent spray of water on the item that is being evaluated. Water supply: In order to successfully complete the test, you will need access to a source of clean water. Testing chamber: The testing chamber is where the product being tested and the water spray are both contained throughout the testing process. Equipment for recording data: This is what is used to record the circumstances of the test and the outcomes

What are the differences between IPX3 and IPX4 waterproof level tests?

Image
The International Electrotechnical Commission (IEC) has defined the IPX3 and IPX4 waterproof level tests in order to evaluate the level of protection provided against water ingress in electronic and electrical products. These tests can be found on the International Electrotechnical Commission website. The strength and length of the water spray used in the IPX3 vs the IPX4 waterproof level testing is the primary factor that differentiates the two. The IPX3 waterproof test requires that the product be sprayed with water from a variety of angles for a period of at least five minutes. At a minimum distance of three meters, the spray need to be directed onto the product while it is being held. The purpose of the IPX3 test is to guarantee that the product can survive being sprayed with water while also preventing any water from entering the device's internal workings. The IPX4 waterproof test , on the other hand, entails subjecting the item to a more rigorous and prolonged water s

What are the differences between IPX1 and IPX2 waterproof level tests?

Image
The International Electrotechnical Commission (IEC) developed the IPX1 and IPX2 waterproof level tests in order to determine how well electronic and electrical equipment are protected against the introduction of water. Depending on the results of these tests, an object may be determined to be waterproof or not waterproof. The key feature that distinguishes the IPX1 and IPX2 waterproof level testing from one another is the intensity and duration of the water seeping and dripping that is performed during the tests. The IPX1 waterproof test entails the product being subjected to a steady stream of water being poured over it for a duration of 10 minutes. The IPX1 test is meant to ensure that a product can withstand a certain amount of water dropping onto it without allowing any of that water to penetrate the device's inner workings. The IPX1 test is designed to ensure that a product can pass this test. This is the most important thing that you need to get out of the exam. The I

What are the differences between IPX5 and IPX6 waterproof level tests?

Image
The International Electrotechnical Commission (IEC) has defined the IPX5 and IPX6 waterproof level tests in order to evaluate the level of protection provided against water ingress in electronic and electrical products. These tests can be found on the International Electrotechnical Commission website. The strength and length of the water jet and spray that is used in the IPX5 and IPX6 waterproof level testing are the primary factors that differentiate the two. The IPX5 waterproof test consists of directing a water jet spray onto the product from a minimum distance of 3 meters for a minimum of 3 minutes. This test must be performed three times. The IPX5 test is designed to guarantee that a product can resist a water jet spray without allowing any water to enter the internal workings of the gadget. This is the primary objective of the test. On the other hand, the IPX6 waterproof test entails a water spray that is both more powerful and longer in duration. The item being sold has to

What are the standard requirements and procedure for IPX3 and IPX4 IP code waterproof tests?

Image
The International Electrotechnical Commission (IEC) has created the IPX3 and IPX4 IP code waterproof tests in order to assess the amount of protection given against water intrusion in electronic and electrical goods. These tests are performed according to the IP code. The IPX3 waterproof test examines a product's capacity to resist water spray from all directions for a minimum of ten minutes. This test determines whether or not the product is waterproof. The water spray is applied from a distance of at least three meters, and it has a flow rate of between eighty and one hundred liters per minute. The purpose of the IPX3 test is to confirm that the product can survive water spray from all directions and that water does not reach the inside of the device. In other words, the test is designed to assess the product's resistance to water. In order to determine whether or not a product is waterproof according to IPX4 standards, it must be able to resist water slaps coming from a

What are the differences between IPX7 and IPX8 waterproof level tests?

Image
The International Electrotechnical Commission (IEC) has specified the IPX7 and IPX8 waterproof tests in order to assess the degree of protection given against water intrusion in electronic and electrical goods. These tests may be found on the International Electrotechnical Commission website. The IPX7 waterproof test determines whether or not a product can remain functional after being submerged in water at depths of up to one meter for a period of at least half an hour. The purpose of the IPX7 test is to confirm that the product is waterproof, and that water does not enter the inside of the device. This may be accomplished by ensuring that water does not permeate the device. The IPX8 waterproof test determines whether or not a product can continue functioning normally after being submerged in water for a lengthy period of time, which is often several hours. The length of time and depth of immersion necessary to pass the IPX8 test are both specified by the manufacturer; neverthele